Key Takeaways
- The tolerance zone extends 18-24″ beyond utility marks, not just to the paint edge. Mechanized equipment is prohibited within this entire zone until utilities are visually exposed through potholing.
- Marks show approximate location only, never exact position or depth. The utility can be anywhere within the tolerance zone, and depth varies unpredictably due to grade changes, erosion, and previous excavations.
- Potholing is mandatory at all utility crossings. Visual confirmation through hand digging or vacuum excavation is the only reliable way to verify location, depth, and facility type before using power equipment.
- Any contact with a utility counts as damage, even without visible leaks. Coating scrapes, conduit deformation, and tracer wire breaks must be immediately reported to the utility owner and documented.
- Full compliance reduces strikes by 99%+. Most utility damage is preventable through proper 811 calls, tolerance zone respect, potholing, and stopping work when marks are unclear or when facilities don’t match tickets.
Every year, utility strikes cause billions in damages, critical infrastructure disruptions, serious injuries, and preventable deaths. The root cause is rarely ignorance; it’s cutting corners. Excavators know they should call 811, but they skip the potholing step. Contractors understand tolerance zones exist, but they eyeball the distance instead of measuring. Crew leaders see faded marks, but they proceed anyway to stay on schedule. These decisions transform routine excavation into high-risk gambling.
This guide eliminates the guesswork. It provides field-ready knowledge on tolerance zones, safe-dig procedures, and legal compliance requirements that every excavator, contractor, and safety manager must know. Whether you’re digging in Pennsylvania’s 18-inch zones or California’s 24-inch corridors, the principles are the same: measure conservatively, pothole early, and stop when uncertain. Let’s break down exactly how far you must dig from a marked line, and what happens when you don’t.
What Is A Tolerance Zone And Why Does It Exist?
Paint marks and flags on the ground show the approximate horizontal path of a buried utility, not its exact location. Locating equipment has inherent accuracy limits, and utilities may have shifted over time. The tolerance zone is a legally mandated safety buffer that accounts for this uncertainty. The Common Ground Alliance standard defines it as the width of the utility plus 18 inches on each side, measured from the facility’s outer edge. State laws may specify 18 to 24 inches.
Within this zone, mechanized excavation equipment is strictly prohibited until the utility is visually exposed and its exact position confirmed. The tolerance zone exists because marks indicate where a utility should be, not where it actually is. Professional underground utility locating provides the initial marks, but utility mark accuracy has inherent limitations that make the tolerance zone necessary.
Understanding Marks, Facilities, and Tolerance Zones
| Term | What it means | Critical fact excavators must know |
| Mark (paint/flags) | Approximate horizontal path of buried utility | Mark ≠ exact facility location; can be offset by several inches; provides NO depth information |
| Facility (buried utility) | Actual underground pipe, cable, or conduit | Can be anywhere within tolerance zone; depth is variable and unpredictable |
| Tolerance zone | Legal buffer extending 18-24″ on each side of mark (state-dependent) | NO mechanized equipment until facility visually exposed |
APWA Color Codes (High-Risk Utilities)
- Red (Electric) → Electrocution/fire risk; high-voltage may require 10-20+ ft clearance
- Yellow (Gas) → Explosion risk; high-pressure lines may need 10-30 ft setback; report ALL damage
- Orange (Communications/Fiber) → Sensitive; high repair costs; critical infrastructure
- Blue (Water) → High-pressure flooding risk
- Green (Sewer) → Biohazard exposure; PPE required
How Far Is The Tolerance Zone And How Do You Measure It?
Tolerance zone distances are set by state law and vary from 18 to 24 inches on each side of the marked line. Some states use fixed distances; others calculate the zone based on pipe diameter. You measure from the marks on the ground surface, not from the buried facility itself. When state law, utility company requirements, and CGA guidance conflict, always use the most conservative (widest) measurement. Check your state’s 811 laws before every project; working across state lines means different rules apply to tolerance zone excavation.
Tolerance Zone Distances by State (Examples)
| State | Distance | How measured | Key notes |
| Pennsylvania | 18″ each side | From facility outer edge | PA Act 50 |
| Florida | 24″ each side | From facility outer edge | Florida Statute 556 |
| California | 24″ each side | From facility outer edge | CA Gov Code §4216 |
| Texas | ½ diameter + 18″ | Variable based on pipe size | Larger for transmission lines |
| Illinois | 18″ + diameter | From outermost edge | Wider for larger facilities |
| New York | ½ diameter + 24″ | From centerline | Assumes centered facility |
How to Measure Tolerance Zones Correctly
- Centerline paint: Measure stated distance (18″ or 24″) on each side of the paint center
- Dual marks/corridor: Measure from the outer edge of the outermost mark on each side, then add the tolerance distance
- Wide or faded paint: Measure from both outer edges; if unclear, add extra buffer (conservative approach)
- Offset marks: Calculate actual facility position from offset notation, then measure tolerance from that position
- Unknown facility size: Assume 6-8″ for distribution, 12-24″ for transmission; add 12″ buffer when in doubt
- Measure horizontally: Tolerance zone is on the ground surface plane; provides NO depth information
What Can You Do Inside The Tolerance Zone?
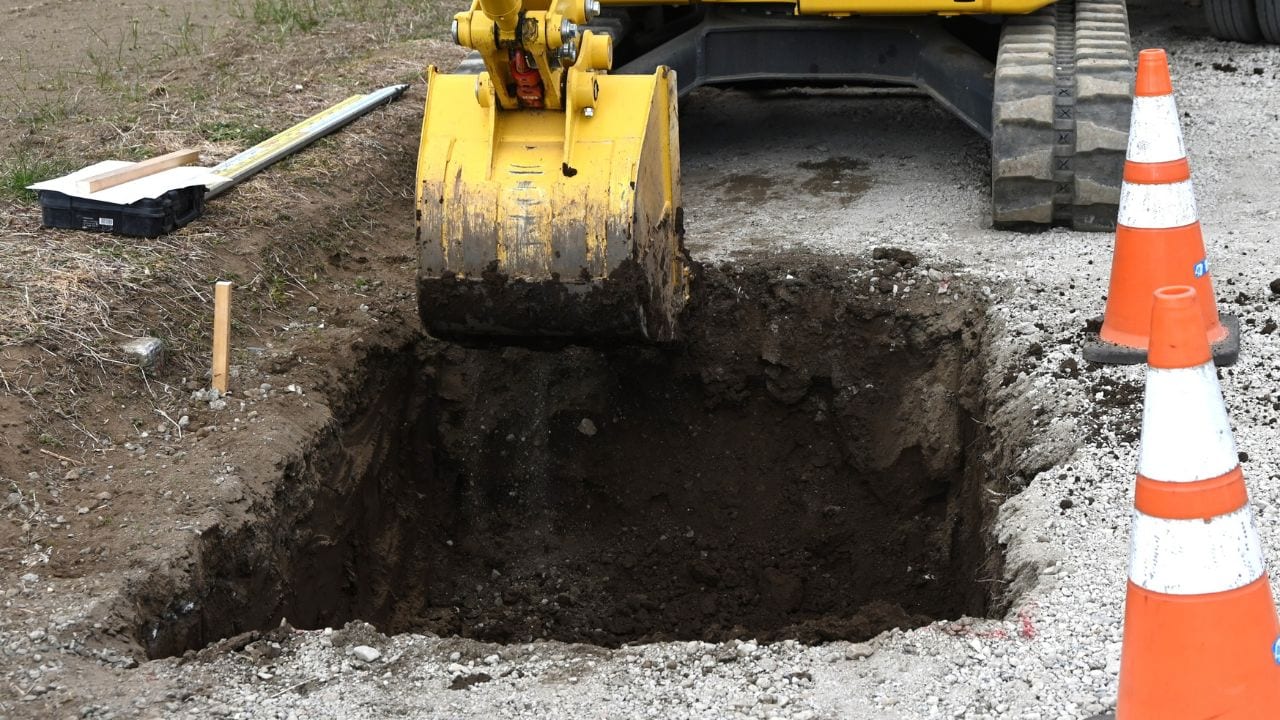
Only non-mechanized excavation methods are permitted within the tolerance zone until the utility is visually exposed. Hand tools and vacuum excavation (hydro or air) are approved methods. All mechanized equipment, backhoes, excavators, trenchers, and augers are prohibited. You must pothole to visually confirm the utility’s exact location, depth, and condition before mechanized excavation can resume.
Vacuum excavation is the safest and most efficient method for exposing utilities. Hand digging tolerance zone requirements apply whenever utilities are present, and safe digging rules mandate visual confirmation before proceeding.
Permitted Excavation Methods Inside Tolerance Zone
| Method | Status | Requirements | When prohibited |
| Hand tools | Permitted | Use blunt/rounded shovels; dig at 45° angle; stop when coating visible | Near high-pressure gas without operator present (some jurisdictions) |
| Vacuum excavation (hydro/air) | Permitted (preferred) | Maintain nozzle standoff; no direct contact with utility | None; safest method available |
| Mechanized equipment | PROHIBITED | Cannot use until facility exposed, verified, and protected | Until visual confirmation complete |
When You Can Use Power Equipment
- Facility visually exposed for 3-5 feet minimum to confirm direction
- Position, depth, and type verified against ticket
- Required clearance (18-24″ or operator-specified) can be maintained
- Facility adequately supported and protected
Step-By-Step: How To Dig Safely Near Marked Utilities
Safe excavation near marked utilities requires a systematic approach. The following six-step workflow ensures compliance and prevents strikes. Execute each step before proceeding to the next, skipping steps is the primary cause of preventable utility damage.
Essential Safe-Dig Workflow (6 Steps)
Step 1: Verify Before You Dig
- Confirm ticket valid and all utilities marked or cleared
- Walk site and check marks are visible and complete
- If marks unclear/missing, STOP and call 811 for remark
Step 2: Measure and Mark Tolerance Boundaries
- Use correct state distance; measure from marks
- Paint or flag tolerance zone edges in contrasting color
- Brief crew: “Hand dig only” or “No equipment” within boundaries
Step 3: Pothole at All Crossings
- Use hand tools or vacuum excavation to expose utility before crossing
- Pothole at each trench entry/exit through tolerance zone
- Expose 3-5 feet to verify direction, depth, and facility type
- Learn more about what potholing is in construction
Step 4: Verify Facility Matches Ticket
- Check coating color matches expected utility type (yellow=gas, orange=comm, etc.)
- Measure depth and clearance to planned excavation
- Photograph with tape measure for documentation
Step 5: Protect and Support Exposed Utilities
- Support to prevent sagging; protect from equipment and falling material
- Maintain required clearance as work proceeds
- Mark with flagging to keep the crew aware
Step 6: Stop and Escalate If Anything Is Wrong
- Facility not where marked? Stop and notify the locator
- Unmarked utility found? Stop and call 811 emergency
- Cannot maintain clearance? Revise the plan or use the trenchless method
When Are You At Higher Risk, And Who Is Responsible?
Risk increases with site complexity and uncertainty. Utility depth varies due to grade changes, erosion, settlement, and previous excavations. No standard burial depth exists; utilities can be anywhere from surface level to several feet down. The marks on the ground provide horizontal position only; depth must be confirmed through potholing for utilities. Always assume the worst case until visual confirmation proves otherwise.
High-Risk Conditions Requiring Extra Caution
- Grade changes, fill, or overlays since utility installation (depth uncertainty)
- Congested corridors with multiple parallel/crossing utilities
- Previous excavations or disturbed soil (facilities may have shifted)
- Faded marks, recent paving, or surface changes after marking
- Seasonal impacts: frost heave, erosion, and standing water obscuring marks
Who Is Responsible for What
| Party | Key Responsibilities | Critical actions |
| Excavator | Call 811 (2-3 days advance); respect tolerance zone; hand-dig to expose; protect marks; stop/report damage | Document tickets, photos, measurements; never backfill damage |
| Locator/Utility Owner | Mark within 48-72 hours; use correct colors; communicate limitations; respond to conflicts | Provide positive response; return for remarks when requested |
Essential Documentation
- 811 ticket numbers and positive responses
- Pre-dig photos showing marks and tolerance measurements
- Photos of exposed utilities with tape measure showing clearance
- Record of any locator meets or operator communications
What To Do If You Damage A Utility
Even minor contact with a utility requires immediate action. Damage includes any contact that compromises the utility’s integrity or protective coating, not just visible leaks or breaks. Follow these steps in order without deviation. Failure to report damage is illegal in all states and creates life-safety hazards.
Immediate Response to Utility Contact or Damage
- Stop work immediately – shut down equipment; do not backfill
- Secure area – establish safety perimeter; evacuate if gas/electric hazard
- Call 911 – for gas leaks, sparking electric, or life-safety threats
- Notify utility owner and 811 – per state law (immediate notification required)
- Do not attempt repairs – only utility personnel may repair facilities
- Document everything – photos, time, location, witness names, notifications made
IMPORTANT: What Counts as Damage Even Without a Leak:
- Coating scrapes on pipes/cables (compromises corrosion protection)
- Tracer wire breaks (impairs future locating)
- Conduit deformation or fiber sheath contact (may cause delayed failure)
- Any contact requiring utility owner inspection
Frequently Asked Questions
Can I use my excavator if I stay outside the painted marks?
No. The tolerance zone extends 18-24″ beyond the marks. The entire zone prohibits mechanized equipment until utilities are visually exposed.
Should I pothole before crossing every marked line?
Yes. Potholing is the only way to verify the exact position and depth. It removes uncertainty and prevents strikes.
What if state law says 18″ but the utility owner requires 24″?
Always follow the most conservative (largest) distance. Operator requirements supplement, not reduce, state minimums.
What if I find an unmarked utility?
Stop immediately, call 811 to report, and request an emergency locate. Do not proceed until the facility is marked or cleared.
Your Compliance Checklist
Full compliance with safe-dig procedures can reduce utility strikes by over 99%, according to CGA DIRT data. Most incidents are preventable through proper planning, measurement, and visual confirmation. The difference between a safe project and a catastrophic strike often comes down to taking the time to pothole, measure correctly, and stop when something looks wrong. Make these procedures non-negotiable on every job site.
FINAL CHECKLIST: Every Excavation, Every Time
✓ Call 811 at least 2-3 days before digging
✓ Verify all utilities marked or cleared (positive response)
✓ Measure and physically mark tolerance zone boundaries
✓ Pothole by hand or vacuum at all utility crossings
✓ Visually confirm the facility before using power equipment
✓ Maintain required clearance and protect exposed utilities
✓ Document with photos and measurements
✓ Stop and call 811 if marks are unclear or the facility not where expected
Safe-dig culture comes down to: Measure conservatively. Pothole early. Stop when uncertain. Document everything.
Need professional utility locating services or vacuum excavation support? Contact Bess Utility Solutions to ensure your next project starts with accurate, reliable utility information.